Thursday, April 29, 2010
Windows 8 2012??
Pengeluaran windows 7 pada 22 oktober yang lalu masih lagi hangat untuk kita semua,namun samada kita tahu ataupun tidak pembangunan sistem operasi selepas windows 7 iaitu windows 8 dikatakan bakal direalisasikan pada akhir 2011 ataupun awal tahun 2012…Bukan itu sahaja,Windows Server 8 dijangkakan akan turut direalisasikan.
Walaupun berita mengenai windows 8 buat masa kini masih belum banyak boleh diperkatakan namun terdapat beberapa info mengenai windows 8 ini :
• Windows 8 akan menyokong 32,64 dan kemungkinan 128-bit.
• Fungsi Hibernate dan resume pada windows 8 akan mempunyai enjin baru.
• Windows 8 akan mempunyai sistem rangkaian yang baru.
• Windows 8 akan mempunyai sokongan lebih baik untuk multimonitor.
• Steven Sinofsky,presiden dari Windows bertanggungjawab dalam pembangunan
windows 8 ini.
Jika Windows 7 dikatakan lebih baik daripada Windows Vista,Nampaknya Microsoft perlu menjadikan Windows 8 lebih baik dari Windows 7.Sama-sama kita menunggu berita mengenai Windows 8 ini.
Sumber:cekapkomputer
Lajukan firefox utk pengguna tingkap 7 & ubuntu 9.10
2.Taip dekat filter ipv6 dan akan keluar paparan seperti dibawah:
Kebiasaanya default set value = false so double klik bagi jadi value = true
p/s Tinkap 7 ini dengan ubuntu ada setting untuk ipv6, so dekat Malaysia nie masih banyak lagi yang tak menggunakan ipv6, masih menggunakan teknologi lama iaitu ipv4.
3.Taip kat filter network http.pipelining dan double klik bg value = true
4.Taip lagi filter network http.pipelining.maxrequests default value = 4 so untuk melajukannya bolehla tukar ke integer yang lebih besar berdasarkan nilai yang asal misalnya 8. kalau nak power lagi letakla 30, mungkin akan bertambah laju.
5.Taip lagi kat filter tue network http.proxy.pipelining pastu double klik bg value = true
6.Last skali Restart firefox and selamat melayari Firefox dengan lancer dan suksess...
Muat turun Windows Movie Maker terbaru untuk Windows7
Assalamualaikum....
Kali ini kita akan berkongsi sedikit tentang applikasi Windows Movie Maker dalam Windows 7.Sekiranya ada seorang pengguna Os ini, anda pasti akan perasan bahawa perisian Windows Movie Maker ini tidak tersedia dalam Windows 7 bermula dari Stater pack hinggalah ke Profesional pack.
Tahukah anda bahawa dalam Os windows 7, applikasi Windows Movie Maker dinamakan sebagai Windows Live Movie Maker dan ianya sebahagian daripada Windows Live Essentials (WLE).Windows Live Movie Maker dilengkapi dengan lebih banyak ciri-ciri menarik dan terbaru.Antaramuka Windows Movie Maker yang baru ini juga sedikit berbeza dengan versi sebelum ini.Pesanan bahawa Windows Live Movie Maker hanya sesuai dipasang pada OS Windows 7 dan Vista sahaja ini bermakna Os Windows Xp dan kebawah tidak dapat menjalankan perisian ini.
Anda boleh muat turun perisian ini secara percuma di
http://download.live.com/moviemaker
Sumber:cekapkomputer
Buat partition untuk windows 7
Tutorial kali ini adalah untuk membuat 'partition' HDD anda menggunakan sistem operasi Windows 7. Ada 2 langkah yang boleh anda lakukan. sila lihat tutorial di bawah :-
Using Disk Management
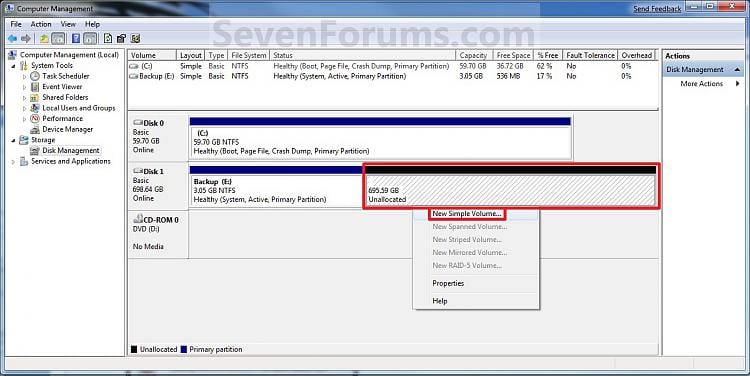
1. You will first need to shrink a partition or volume from the free space on a disk to create unallocated space on that disk to use to create the new partition or volume with on the same disk.
2. Open the Control Panel (All Items view), and click on the Administrative Tools icon. then close the Control Panel window.
3. Click on Computer Management in Administrative Tools, then close the Administrative Tools window.
4. In the left pane under Storage, click on Disk Management. (See screenshot below)5. In the middle pane, right click on the empty unallocated partition or volume and click on New Simple Volume. (See screenshot above)
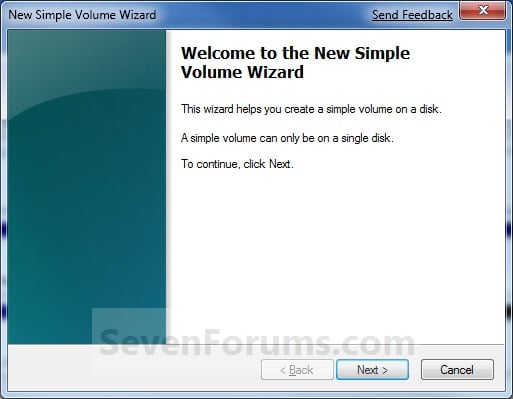
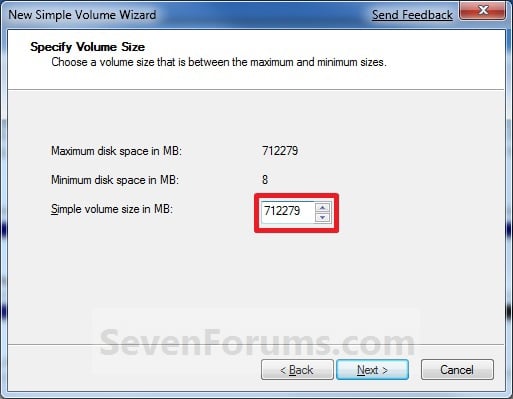
6. Click on the Next button. (See screenshot below)7. Type in how many MB (1 GB = 1024 MB) you want to use from the unallocated partition to create the new partition with, then click on the Next button. (See screenshot below)
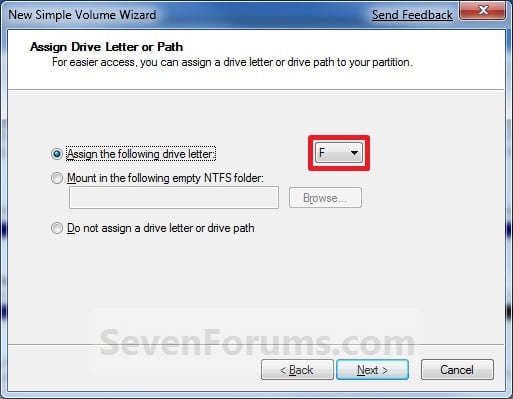
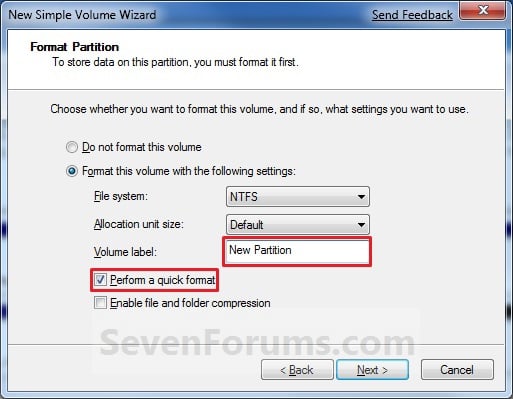
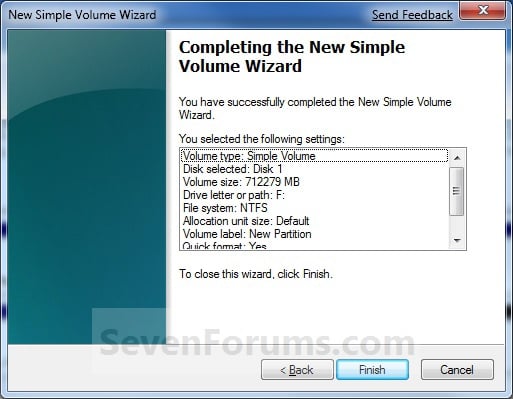
NOTE: If you want to use all of the unallocated partition to create the new partition with, then type all of the maximum disk space shown for the unallocated partition. If you do not use all of the maximum disk space, then you can use the left over space from the unallocted partition to create another new partition with.8. Select an available drive letter that you want to be assigned to the new partition in Computer, then click on the Next button. (See screenshot below)9. Type in a volume label name that you want for the new partition, check the Perform a quick format box, and click on the Next button. (See screenshot below)10. Click on the Finish button. (See screenshot below)11. The new primary partition or volume has now been created with the assigned unallocted partition space (step 7). (See screenshot below)12. Close the Computer Management window. (See screenshot above)
Using Diskpart in a Elevated Command Prompt
2. Open a elevated command prompt, or a command prompt at boot.
3. In the elevated command prompt, type diskpart and press Enter. (See screenshot below)
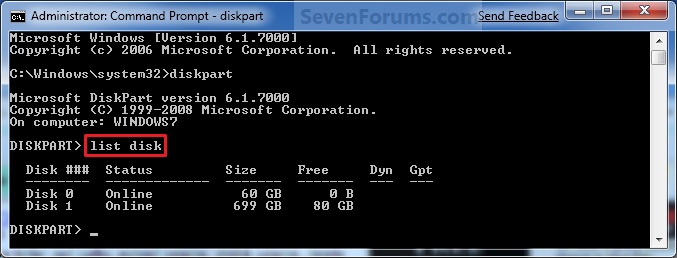
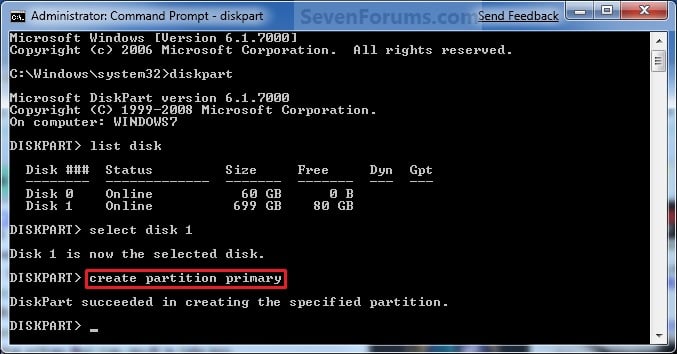
4. In the elevated command prompt, type list disk and press Enter. (See screenshot below)
NOTE: This is to help you ID the disk number that has Free unallocated space that you want to create a new partition with. For example, Disk 1 with 80 GB of free space.
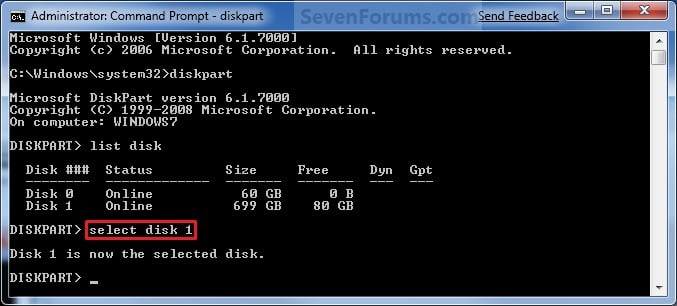
5. In the elevated command prompt, type select disk # and press Enter. (See screenshot below)
NOTE: You would substitute # for the disk number listed that you want to create a new partition with the free unallocated space there. For example, I want to create a new partition with the 80 GB of free space, so I would type select disk 2 and press Enter.
6. In the elevated command prompt, type create partition primary and press Enter. (See screenshot below)
NOTE: This will create a new blank RAW partition with selected disk (step 5) that contains the unallocated partition free space.
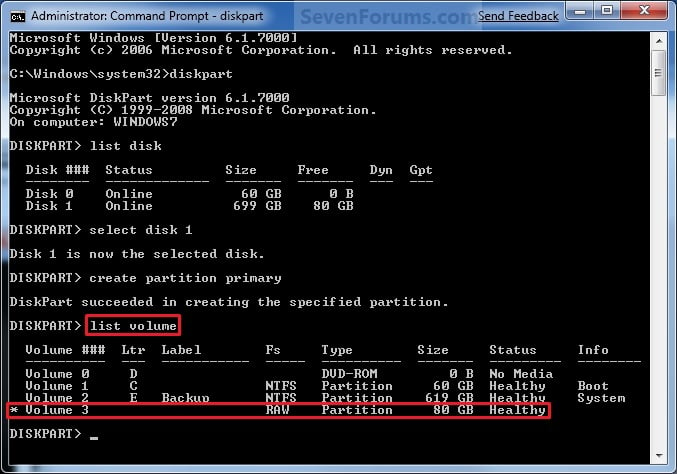
7. In the elevated command prompt, type list volume and press Enter. (See screenshot below)
NOTE: Look for the volume number that has the same Size as from the Free space in step 4. For example, Volume 3.
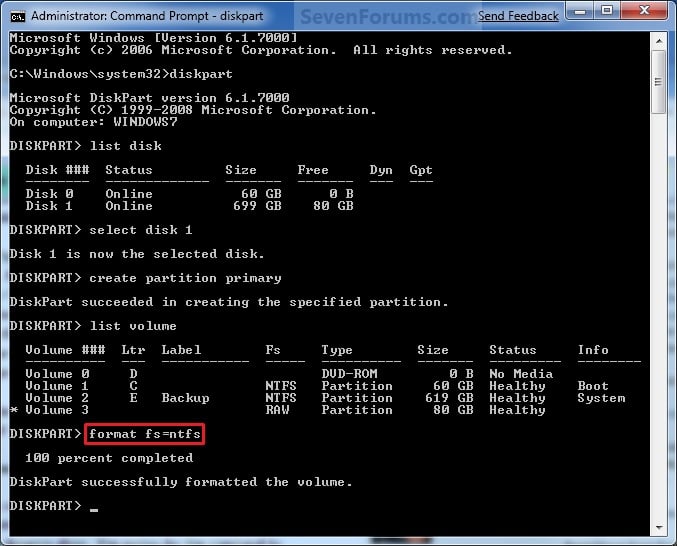
8. To Format the Partition or Disk as a NTFS File System -
NOTE: This would be good for using with Windows 7 or Vista for example.
A) In the elevated command prompt, type format fs=ntfs quick and press Enter. (See screenshot below)9. To Format the Partition or Disk as a FAT32 File System -
NOTE: Having quick added at the end of the command will do a quick format instead of a full format on the new blank RAW partition (step 6) to make it a new partition.B) Go to step 10.
NOTE: This would be good for using with a USB key drive for example.
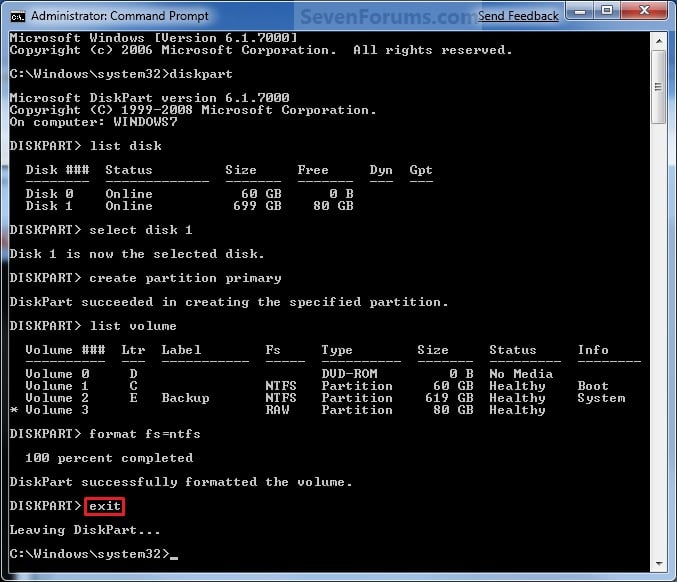
A) In the elevated command prompt, type format fs=fat32 quick and press Enter. (See screenshot below)10. When it is finished formatting, type exit in the elevated command prompt and press Enter. (See screenshot below)
NOTE: Having quick added at the end of the command will do a quick format instead of a full format on the new blank RAW partition (step 6) to make it a new partition.
11. Close the elevated command prompt.
12. The new primary partition has now been created. You can now see the new partition in Computer with a drive letter.
harap dapat membantu.
wsalam
sumber : www.sevenforum.com
Wednesday, April 28, 2010
Dari PPD Mersing mengenai kewujudan laman blog jktmersing
Tuesday, April 27, 2010
Buang 'fake antivirus'
ada banyak antivirus palsu yang selalu mengganggu sistem operasi komputer kita. salah satu cara untuk membuangnya ialah seperti di bawah :-
Antivirus Live is one of many fake antivirus applications like Advanced Virus Remover and Internet Security 2010, that are really rogue viruses that take your computer hostage—then they tell you that your computer is infected by viruses, and you have to pay them to get rid of the fake viruses that aren’t really there. It’s a huge problem, and they are not easy to remove, because they block virtually everything you try and run, including real anti-malware tools.
Removing Rogue Fake Antivirus Infections (General Guide)
There’s a couple of steps that you can generally follow to get rid of the majority of rogue antivirus infections, and actually most malware or spyware infections of any type. Here’s the quick steps:
- Try to use the free, portable version of SUPERAntiSpyware to remove the viruses.
- If that doesn’t work, reboot your PC into safe mode with networking (use F8 right before Windows starts to load)
- Try to use the free, portable version of SUPERAntiSpyware to remove the viruses.
- Reboot your PC and go back into safe mode with networking.
- If that doesn’t work, and safe mode is blocked, try running ComboFix. Note that I’ve not yet had to resort to this, but some of our readers have.
- Install MalwareBytes and run it, doing a full system scan. (see our previous article on how to use it).
- Reboot your PC again, and run a full scan using your normal Antivirus application (we recommend Microsoft Security Essentials).
- At this point your PC is usually clean.
Those are the rules that normally work. Note that there are some malware infections that not only block safe mode, but also prevent you from doing anything at all. We’ll cover those in another article soon, so make sure to subscribe to How-To Geek for updates (top of the page).
Let’s Remove Antivirus Live
The first thing you’ll want to do is reboot your computer, and hit the F8 key right before Windows starts loading (you can hit it a bunch of times). Then select the Safe Mode with Networking option.
Before you do anything else, you’re going to need to fix the internet connection to work, because Antivirus Live changes IE to use a fake proxy server that prevents you from getting to anything else—and will also prevent you from installing and updating a real anti-malware software.
Now you’ll want to install SuperAntiSpyware (linked above), which you have hopefully downloaded via another computer already, but safe mode with networking should allow you to download and install it.
Once you load it up, it’s going to do some analysis…
Then you’ll see the full application screen, where you’ll want to use the Check for Updates button to make sure you have the latest definitions. Once you’ve done that, click the Scan your Computer button.
Select your primary drive at least, though you should pick all the drives, and then click the Perform Complete Scan button.
It’ll run for a long time, detect a bunch of stuff, and then you can proceed through the wizard to actually removing it all…
Once it’s all done, you can reboot the PC again (just make sure to go back into Safe Mode again).
Next you’ll want to install Malwarebytes, make sure to check the Update tab for the latest definitions, and then perform a full scan of your system.
Malwarebytes will find even more malware that SuperAntiSpyware missed (seems like you always need more than one util to get it all). Just be sure to click the Remove Selected button to get rid of the rest.
At this point you’ll want to reboot your system, and then install Microsoft Security Essentials and run another full scan. Can’t hurt to be too cautious!
Asas Rangkaian (Basic Networking) - Kabel Ethernet
Penerangan:
---------------------
Ethernet crossover cables are most often used in home networks when connecting two ethernet computers without a hub. An Ethernet crossover cable has it's send and receive wires crossed. When using a hub or switch, this is automatically done for you.
Unfortunately some devices like cable and dsl modems have their actual ethernet plugs reversed. This is to allow people to hook up a cable modem to a computer without a special crossover cable. When adding a hub into the mix, the issue can get confusing.
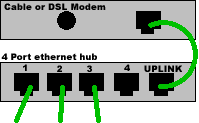
Most modern hubs and switches have what is called an uplink port on them. This is the same kind of 'reversed' port that is on a cable or dsl modem.
Saya akan cuba menterjemahkan sebaik mungkin, jika ada salah silap minta ditunjukkan supaya saya dapat memperbetulkan ayat/gaya bahasa serta kandungan agar apa yang hendak disampaikan dapat diterima dengan jelas dan sempurna.
"Kabel Ethernet Bersilang banyak digunapakai pada rangkaian di rumah apabila menyambungkan dua komputer yang tidak mempunyai hub/switch. Kabel Ethernet Bersilang ini mempunyai isyarat Terima dan Hantar bersilang pada kedua dua hujung sambungan. Apabila anda menggunakan hub/switch, ianya akan secara automatik menyilangkan untuk anda. Walaubagaimanapun sesetengah peranti seperti cable modem atau ADSL modem mempunyai plug ethernet yang telah sedia bersilang. Ini memudahkan pengguna untuk menyambung kabel dari modem ke komputer tanpa memerlukan kabel bersilang khas. Apabila menambah peranti hub kedalam sesuatu rangkaian rumah, ini akan menyebabkan kekeliruan berlaku kerana kebanyakkan peranti hub/switch mempunyai apa yang dipanggil sebagai uplink port. Peranti berkenaan adalah sama seperti apa yang disebut sebagai "reversed" port seperti mana yang terdapat di cable modem atau DSL modem."
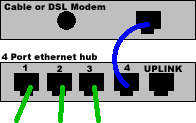
Rujuk contoh gambar dibawah bagi menerangkan asas perbezaan untuk penerangan diatas :
GREEN cables represent standard ethernet cables
BLUE cables represent CROSSOVER cables
Asas Kabel Cat5/Cat5e
-----------------------------
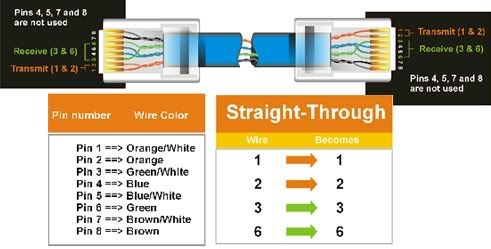
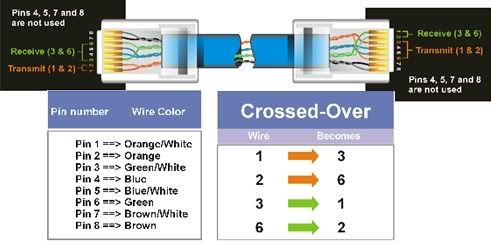
Berikut adalah rujukan pada semua FT bagi membuat wiring pada kabel jenis Cat5 atau Cat5e . Simbol warna digunakan untuk menentukan hala tuju isyarat yang digunakan didalam komunikasi antara peranti/komputer didalam sesebuah rangkaian.
Kabel Standard Ethernet :
Kabel Bersilang Ethernet :
Gangguan Internet Sehingga 2 Mei 2010
Mungkin beberapa hari ini, anda mengalami gangguan sambungan internet, dimana pelayaran web luar negara sedikit terganggu berbanding sebelumnya. Ini adalah kerana berlakunya gangguan di sambungan kabel rangkaian yang menjadi perantaraan antara Malaysia dengan Eropah dan Amerika Syarikat.
Gangguan ini dijangka akan berlanjutan sehingga 2 Mei, dimana langkah membaikinya sedang dijalankan buat masa ini. Pada masa yang sama, TM telah mengambil langkah mengurangkan gangguan dengan menambah pautan baru menerusi kabel yang lain, dan penyedia internet yang lain.
Laman web daripada luar negara terutamanya akan mengalami masa loading yang agak lama berbanding sebelum ini, dan ianya dijangka, pengguna yang menggunakan Virtual Private Network tidak akan mengalami sebarang gangguan kritikal, dan jika berlaku sebarang gangguan, ianya hanyalah amat minimal.
Sumber : aMaNz
Friday, April 16, 2010
Mengenali bunyi "beep" pada pc anda
Ada beberapa jenis ‘beep’ pada komputer yang sering sekali kita dengar, antaranya adalah :
- Bunyi ‘beep’ pendek 1 kali, memberitahu bahawa komputer anda telah berjayal melakukan dan menghidupkan semua komponen yang diperlukan untuk proses boot-up komputer. Jika bunyi ini yang terdengar tetapi PC anda tidak juga menyala, cuba anda cek kabel VGA anda, apakah sudah terpasang dengan betul atau tidak, atau cuba cek monitor anda, apakah monitor anda sudah berfungsi dengan baik atau tidak. Sebaliknya, jika komputer berjaya menyala tetapi tidak ada suara ‘beep’ sebelumnya…cuba anda cek internal speaker pada motherboard anda, atau cek motherboard.
- Bunyi ‘beep’ pendek 2 kali, artinya ada masalah pada konfigurasi atau seting pada CMOS.
- Bunyi ‘beep’ panjang 1 kali dan pendek 1 kali, artinya ada masalah pada cakera keras Motherboard atau Memory anda, cuba cek ulang apakah kedua perangkat tersebut masih bisa berfungsi/terpasang dengan baik atau tidak.
- Bunyi beep panjang 1 kali dan pendek 2 kali, artinya ada masalah pada monitor atau VGA Card.
- Bunyi ‘beep’ panjang 1 kali dan pendek 3 kali, artinya ada masalah pada Keyboard, cuba cek keyboard anda, atau cuba cek sambungan kabel dari keyboard yang biasanya dipasang ke port serial, ps2, ataupun usb.
- Bunyi ‘beep’ panjang 1 kali dan pendek 9 kali,bermaksud ada masalah pada ROM BIOS.
- Bunyi ‘beep’ panjang terus-menerus, bermaksud ada masalah di DRAM.
- Bunyi ‘beep’ pendek terus-menerus, bermaksud ada masalah pada power supply.
- Pada beberapa merk Motherboard akan mengeluarkan bunyi ‘beep’ beberapa kali apabila temperatur processornya terlalu tinggi (panas).
Catatan : kode bunyi beep diatas berlaku pada AWARD BIOS, untuk jenis BIOS yang lain kemungkinan memiliki kode bunyi beep yang berbeza.
wsalam
harap-harap dapat membantu..
Wednesday, April 14, 2010
setup windows server 2008
harap dapat membantu.
To use Windows Server 2008 you need to meet the following hardware requirements:
Component | Requirement |
Processor | • Minimum: 1GHz (x86 processor) or 1.4GHz (x64 processor) • Recommended: 2GHz or faster Note: An Intel Itanium 2 processor is required for Windows Server 2008 for Itanium-based Systems |
Memory | • Minimum: 512MB RAM • Recommended: 2GB RAM or greater • Maximum (32-bit systems): 4GB (Standard) or 64GB (Enterprise and Datacenter) • Maximum (64-bit systems): 32GB (Standard) or 2TB (Enterprise, Datacenter and Itanium-based Systems) |
Available Disk Space | • Minimum: 10GB • Recommended: 40GB or greater Note: Computers with more than 16GB of RAM will require more disk space for paging, hibernation, and dump files |
Drive | DVD-ROM drive |
Display and Peripherals | • Super VGA (800 x 600) or higher-resolution monitor • Keyboard • Microsoft Mouse or compatible pointing device |
Upgrade notes:
I will not discuss the upgrade process in this article, but for your general knowledge, the upgrade paths available for Windows Server 2008 shown in the table below:
If you are currently running: | You can upgrade to: |
Windows Server 2003 Standard Edition (R2, Service Pack 1 or Service Pack 2) | Full Installation of Windows Server 2008 Standard Edition Full Installation of Windows Server 2008 Enterprise Edition |
Windows Server 2003 Enterprise Edition (R2, Service Pack 1 or Service Pack 2) | Full Installation of Windows Server 2008 Enterprise Edition |
Windows Server 2003 Datacenter Edition (R2, Service Pack 1 or Service Pack 2) | Full Installation of Windows Server 2008 Datacenter Edition |
Follow this procedure to install Windows Server 2008:
1. Insert the appropriate Windows Server 2008 installation media into your DVD drive. If you don't have an installation DVD for Windows Server 2008, you can download one for free from Microsoft's Windows 2008 Server Trial website.
2. Reboot the computer.
3. When prompted for an installation language and other regional options, make your selection and press Next.
4. Next, press Install Now to begin the installation process.
5. Product activation is now also identical with that found in Windows Vista. Enter your Product ID in the next window, and if you want to automatically activate Windows the moment the installation finishes, click Next.
If you do not have the Product ID available right now, you can leave the box empty, and click Next. You will need to provide the Product ID later, after the server installation is over. Press No.
6. Because you did not provide the correct ID, the installation process cannot determine what kind of Windows Server 2008 license you own, and therefore you will be prompted to select your correct version in the next screen, assuming you are telling the truth and will provide the correct ID to prove your selection later on.
7. If you did provide the right Product ID, select the Full version of the right Windows version you're prompted, and click Next.
8. Read and accept the license terms by clicking to select the checkbox and pressing Next.
9. In the "Which type of installation do you want?" window, click the only available option – Custom (Advanced).
10. In the "Where do you want to install Windows?", if you're installing the server on a regular IDE hard disk, click to select the first disk, usually Disk 0, and click Next.
If you're installing on a hard disk that's connected to a SCSI controller, click Load Driver and insert the media provided by the controller's manufacturer.
If you're installing in a Virtual Machine environment, make sure you read the "Installing the Virtual SCSI Controller Driver for Virtual Server 2005 on Windows Server 2008"
If you must, you can also click Drive Options and manually create a partition on the destination hard disk.
11. The installation now begins, and you can go and have lunch. Copying the setup files from the DVD to the hard drive only takes about one minute. However, extracting and uncompressing the files takes a good deal longer. After 20 minutes, the operating system is installed. The exact time it takes to install server core depends upon your hardware specifications. Faster disks will perform much faster installs… Windows Server 2008 takes up approximately 10 GB of hard drive space.
The installation process will reboot your computer, so, if in step #10 you inserted a floppy disk (either real or virtual), make sure you remove it before going to lunch, as you'll find the server hanged without the ability to boot (you can bypass this by configuring the server to boot from a CD/DVD and then from the hard disk in the booting order on the server's BIOS)
12. Then the server reboots you'll be prompted with the new Windows Server 2008 type of login screen. Press CTRL+ALT+DEL to log in.
13. Click on Other User.
14. The default Administrator is blank, so just type Administrator and press Enter.
15. You will be prompted to change the user's password. You have no choice but to press Ok.
16. In the password changing dialog box, leave the default password blank (duh, read step #15…), and enter a new, complex, at-least-7-characters-long new password twice. A password like "topsecret" is not valid (it's not complex), but one like "T0pSecreT!" sure is. Make sure you remember it.
17. Someone thought it would be cool to nag you once more, so now you'll be prompted to accept the fact that the password had been changed. Press Ok.
18. Finally, the desktop appears and that's it, you're logged on and can begin working. You will be greeted by an assistant for the initial server configuration, and after performing some initial configuration tasks, you will be able to start working.