Saturday, February 27, 2010

Data Hilang

salam

tutorial kali ini adalah untuk mendapatkan semula data yang telah hilang menggunakan aplikasi Undelete. harap-harap dapat membantu.

It's simple: just click on the Download link and run the_undelete_setup.exe.

IMPORTANT:Do NOT install The Undelete on the same disk that contains the lost/corrupted data! Otherwise, you are risking your data to be overwritten and lost forever. Install The Undelete onto a secondary hard drive, floppy disk, USB drive, network drive, or burn it onto a CD or DVD.

Registering The Undelete.

Run The Undelete.exe , and select "Help" - "About" to register the product if you have already purchased your product key. If you didn't place an order yet, click "Help" - "About" - "Buy Now" to buy a proper registration code, and then click "Input Key". Alternatively, just click here to buy.

Using The Undelete

Running The Undelete is no more complex than launching any other application. Just double-click The Undelete icon on your computer desktop, in the Start menu or in the folder where it's installed.

Restoring files with Recovery Wizard

1. The Recovery Wizard will be displayed automatically when you start The Undelete for the first time. Click Next

NOTE: If you wish to see the Recovery Wizard every time you launch The Undelete, select the "Show wizard on startup" check box.

2. Selecting the disk and searching for lost data

Select a logical disk or a catalog for searching deleted files, check the necessary locations, and then click Next.
The "Add Folder" button is intended for adding the catalogs to the "Folders to search" list.
The "Mount Image" button connects previously created disk images.

3. Selecting file types

If you want to recover all files, skip this step by pressing Next right away.
If you want to recover only certain types of files (e.g. Office documents or digital pictures), specify the type of the files you wish to recover and press Next. The Undelete will start searching for deleted files of the specified type.

4. Summary information

This step will display a final confirmation before starting the search operation. If you want to restrict your search to certain file size or want to locate files created or modified during a certain period of time, click the "Options" button and specify the "File size" and the "Date modified".

Click Next to start searching.

NOTE:The Undelete will display a real-time bar showing you the progress of the search. Please be patient, as canceling the search prematurely will result in starting over.

5. Finishing scanning

To view the discovered lost files click "Finish"

6. Saving the recoverable files.

During the following step you will be able to select the files you'd like to save.

If you're about to recover digital pictures, you can preview them before performing the recovery even with the free version of The Undelete.

Select files or folders to recover, and click "Recover". This will launch the "Export Wizard" automatically.Specify location to save the recovered files to, and click Next. On the last step of the Recovery Wizard you'll see a confirmation window with an underlined link. Click the link to open a folder that contains the recovered files, and click Finish.

Manual File Recovery

Recovering lost and corrupted files without the Recovery Wizard

The Recovery Wizard opens simultaneously with the program main window. Select the corresponding checkbox if you'd like the Recovery Wizard to pop up every time you launch The Undelete. If you prefer full manual control over the recovery process, disable the checkbox and click "Cancel" to close the Recovery Wizard.

1. In the program main window double-click on a logical drive that contains the lost files. The Undelete will automatically scan the selected drive. This operation will take some time, depending on the size of the chosen disk

2. After search is completed, find the file you need, and double-click on its icon.

If you're about to recover digital pictures, you can preview them before performing the recovery even with the free version of The Undelete.

Select the file to recover and click "Recover" to launch the Export Wizard.

About "Recovered files" Folder

The "Recovered files" folder will hold the files located with SmartSearch.
The new SmartSearch technology invented by The Undelete combines the strengths of the two methods. First, it scans your file system and learns about the files that were simply deleted. During the next step, it scans your hard drive directly in order to locate files that are not present in the file system. SmartSearch uses a list of file signatures to detect the beginning and end of recognized file types such as Microsoft Word documents, Excel spreadsheets, or JPEG pictures, more then 100 different types of files in total. This method works rock solid even if your hard drive is 9/10 dead, and its file system is completely non-existent! In that case, SmartSearch will simply scan and recover what's left of your disk and your data. This is similar to what the second class of data recovery products does.
Double-click the "Recovered files" to launch SmartSearch on the selected partition.

After the search is complete, you'll see several folders, each containing files of a certain type. You can preview digital pictures before recovering them. To preview a file simply click on its icon and The Undelete will display a preview on the left hand of the window. Click "Display Preview" for a larger preview.

Select a file or folder to recover and click "Recover" to launch the Export Wizard.


sumber : http://the-undelete.com

Thursday, February 25, 2010

Maulidurrasul

salam

saya bagi pihak semua juruteknik komputer Mersing ingin mengucapkan selamat menyambut Maulidurrasul.

Maulidur Rasul (dalam bahasa Arab bermaksud kelahiran Rasul) adalah hari bersejarah keputeraan Nabi Muhammad. Hari ini jatuh pada hari ke-12 bulan Rabiul Awal sempena kelahiran Nabi yang jatuh pada pada hari Khamis 12 Rabiul Awal Tahun Gajah bersamaan dengan 23 April 571. Baginda adalah nabi terakhir yang diutus oleh Allah Subhanahu Wataala. Tapak kelahiran baginda pula kini mempunyai satu bangunan kecil yang dikenali sebagai Maulid Nabi.

Setiap tahun pada hari itu, umat Islam di seluruh dunia akan mengadakan majlis memperingati keputeraan Nabi Muhammad s.a.w dengan mengadakan beberapa acara seperti perarakan, ceramah dan sebagainya. Banyak kelebihan dan keistimewaan yang akan dikurniakan oleh Allah Subhanahu Wataala kepada mereka yang dapat mengadakan atau menghadiri majlis Maulidur Rasul.

Kita dapat lihat betapa besarnya kelebihan orang yang memuliakan majlis keputeraan Nabi Muhammad Sallallahu Alaihi Wasallam, kerana bila berniat sahaja hendak mengadakan Maulud Nabi, sudah pun dikira mendapat pahala dan dimuliakan. Sememangnya bernazar untuk melakukan sesuatu yang baik merupakan doa dan dikira amal salih.

Jelas kepada kita bahawa pembalasan Allah Subhanahu Wataala terhadap kebaikan begitu cepat sehinggakan terdetik sahaja di hati hendak berbuat kebaikan, sudah Allah Subhanahu Wataala akan memberi pembalasan yang tiada ternilai. Seseorang yang beriman, kuat bersandar kepada Allah, ketika di dalam kesusahan dia tetap tenang dan hatinya hanya mengadu kepada Allah dan mengharapkan pertolongan dan kasih sayang Allah Subhanahu Wataala.

Keberkatan mengadakan Majlis Maulud itu bukan sahaja didapati oleh orang yang mengadakan majlis itu, tetapi seluruh ahli rumah atau orang yang tinggal di tempat itu turut mendapat keberkatannya.


Wednesday, February 24, 2010

lajukan boot pc anda

salam

tutorial kali ini adalah untuk melajukan masa boot pc anda. salah satu daripadanya ialah mengurangkan startup pc anda. cara-caranya ialah :-

1. Klik Start dan kemudian RUN dan taip msconfig


2. Apabila paparan msconfig muncul, klik pada 'selective startup' kemudian buang tanda pada 'load startup item' dan klik apply dan seterusnya ok.


3. restart pc anda untuk hasilnya.


harap dapat membantu. wsalam

Friday, February 19, 2010

install skype step by step

salam

tutorial kali ini adalah untuk install skype langkah demi langkah. Harap dapat membantu.

1. download aplikasi skype 4.1 ke dalam pc anda. kemudian install.


kemudian, klik pada I agree - Install. tanda jika hendak memasang juga THE BROWSER HIGHLIGHT kemudian klik pada 'Continue installing Skype'.


setelah selesai, paparan di bawah akan muncul. klik pada start skype.


satu paparan akan terhasil setelah kita klik pada start skype. isikan maklumat yang bertanda *


tandakan juga di dalam kotak.

sekarang, anda sudah siap untuk memulakan skype anda. Harap berjaya.

wsalam

video meeting

salam

satu program melaksanakan penggunaan ict secara maksimum akan dilaksanakan pada minggu hadapan. sehubungan dengan itu, saya meminta semua juruteknik daerah Mersing supaya membuat beberapa perkara untuk memastikan agar program ini akan berjalan dengan lancar. Perkara tersebut ialah :-

1. install skype dan buat akaun. skype tadi hendaklah di pasang pada pc yang akan digunakan pada hari tersebut. jika tiada bolehlah download di sini.

2. Pasang webcam pada pc tersebut beserta headphone.

apabila selesai semua perkara di atas, maka anda sudah bersedia untuk bermula. sebarang masalah bolehlah menghubungi saya di talian 012-7811877.

wsalam

1000 pengunjung


salam

saya mengucapkan jutaan terima kasih kepada semua pungunjung laman blog jtkmersing ini. hari ini telah tercapai jumlah pengunjung kepada 1000. semoga di masa akan datang jumlah pengunjung akan bertambah.

insyaAllah.

buat banner pada header blog anda menggunakan Photoshop

salam.

entri kali ni adalah untuk buat banner pada blog anda. Harap dapat membantu.

wsalam

Simple step-by-step tutorial on how to create a web site banner and logo in Photoshop. The sample .psd and completed website are also included.

A banner or a header is a graphic that is found at the top of a web site which usually displays the company name and the logo. It is often the first thing a person sees when they open the website. The blending of colors should be attractive, informative, comfortable for the eye and help to convince the viewer to stay on your site.

Let's start with our banner. Here we have a general banner and the colors used are soothing to the eyes. It can be used for a fashion and beauty banner or a personal or holiday banner as well.


Follow the below steps to create the above website banner :

Step 1 : Creating the banner size
Open a new file by clicking on File>Open. Make the file size width of 780px and height of 120px. You can go till 140px for the height. You can make a banner flexible according to your design.

Step 2: Giving the background color
Create a new layer. Name it bgcolor. Give a background color by doing the following:

  • Change the foreground color to #E4D1B8.
  • Click on the Paint Bucket Tool seen in the tools panel on the right.
  • Click on the canvas with your mouse. Your background color is now changed to the new color.

Step 3 : Giving the inside background color
Create a new layer. Name it insidecolor. Select Rectangular Marquee Tool seen in the tools panel on the right. Make the rectangle size width of 760px and height of 100px inside the background. Fill it with color # C64866 using the paint bucket tool.

Step 4 : Creating the logo background
Create a new layer. Name it logobkg. Select Rectangular Marquee Tool. Make the rectangle size width of 120px and height of 100px. Put the rectangle in the left side of the banner. Fill it with black color # 000000.

Step 5 : Creating a logo using the custom shape tool
Create a new layer. Name it logo. Choose the custom shape tool seen in the tools panel on the right. Click on the Shape drop down menu seen on the top toolbar. Click on the arrow and select Ornaments. Look for the ornament which is in the banner.
Drag it in the logo space and position it so it comes in the middle of the logo background. Now you have a temporary ornament as a logo which can be replaced with your company logo if needed.

Step 6 : Creating the vertical lines in the banner
Create a new layer. Name it band. Select Rectangular Marquee Tool. Make the rectangle size width of 7px and height of 120px. Put the rectangle in the middle of the banner. Fill it with color # E8B0BD. Make four copies of the layer band.

To make a copy, right click on the layer and click on duplicate. A screen named Duplicate Layer will appear.


Enter name of the layer as band copy. Click on OK. Do the same with band copy2, band copy3, band copy4. Place the bands properly in the banner.

Step 8 : Creating the Logo Border
Create a new layer. Name it border. Select Rectangular Marquee Tool. Make the rectangle size width of 20px and height of 100px. Fill it with color # A63D56. Put the rectangle on the right of the logo background. Make a copy and place the new rectangle on the left of the logo background.

Step 9 : Creating the dashed lines
Now select the Horizontal Type Tool (text tool). Type" _________" using the hyphen key. Place it on the top of the banner. Make a copy, right click on the layer and click on duplicate. Place it at the bottom of the banner.

Step 10 : Adding your Company Name
With the text tool type your company name or website name with the color # FCF3E5.

Congratulations! Your website banner with the logo is ready!

An example of a layout that you can create with this header is shown below. Click here to view the website. Download the website files here.


sumber : http://www.entheosweb.com/photoshop/banner.asp

Thursday, February 18, 2010

Ubuntu dan Anda

salam

ntri kali ini adalah bertujuan untuk membuka minda kita supaya berjinak-jinak dengan open-source. Selain daripada Linux, Ubuntu juga adalah salah satu Operating System Open-Source. Di bawah adalah sedikit pengenalan dan kegunaan Ubuntu.

startup-screen

Jika anda mempunyai sekeping CD Ubuntu, ianya bukan sahaja berguna untuk mencuba distro Linux yang popular ini, malah anda boleh menggunakannya untuk membaik pulih Windows serta menyelamatkan data.

CD pemasangan Ubuntu mempunyai fungsi Live CD, di mana anda boleh menjalankan Ubuntu terus dari CD tanpa perlu install ke dalam hard disk terlebih dahulu. Meskipun fungsi Live CD ini adalah terhad berbanding pemasangan sebenar ke dalam hard disk, namun ianya sudah cukup untuk saat-saat kecemasan di mana Windows anda tak dapat dibuka.

Apa yang anda perlu buat adalah hidupkan komputer dan masukkan CD Ubuntu. Apabila skrin Ubuntu dipaparkan, pilih “Try Ubuntu without an change to your computer”.

Antara kegunaan Live CD Ubuntu:

  • Akses semua partition termasuklah jenis FAT dan NTFS.
  • Menghubungkan komputer anda kepada komputer lain melalui network.
  • Melayari Internet.

Jadi, dengan Live CD Ubuntu ini anda boleh backup dahulu dokumen-dokumen penting anda ke dalam partition lain, atau mungkin juga ke dalam komputer lain melalui network.

Malah anda boleh menggunakannya untuk melayari Internet, membuka emel, dan berbual di IM meskipun anda tidak mempunyai hard disk sekalipun. Ubuntu menyokong banyak jenis modem, dan sekiranya anda berada dalam kawasan Wi-Fi, ia juga boleh diaktifkan.

Cara Untuk Lajukan Windows XP

salam

Walaupun Windows Vista telah lama dilancarkan oleh Microsoft, kebanyakan dari kita masih lagi menggunakan Windows XP sebagai Operating System. Ini mungkin kerana anda telah biasa dengan Windows XP, dan lebih selesa dengannya. Mungkin juga anda memilih Windows XP kerana ia kurang mengalami masalah compatibility dengan software lama.

Setelah menggunakan Windows XP buat beberapa ketika, anda mungkin perasan PC anda menjadi semakin lembab berbanding semasa baru lepas install Windows dahulu. Selain dari memastikan komputer anda bersih dari Virus dan Malware, terdapat beberapa perkara yang anda boleh amalkan untuk memastikan Windows XP berjalan dengan lebih lancar. Di sini saya ingin kongsi lima tips berikut:


Tetapkan Program Yang Dibuka Sewaktu Startup

laju-xp-02 Setiap kali Windows dimulakan, ia akan melancarkan sejumlah program secara automatik. Program ini dipangil sebagai Startup Program. Namun, tidak semua dari program ini diperlukan sentiasa, sebaliknya anda hanya akan buka program tersebut bila perlu.

Terdapat beberapa cara yang boleh digunakan untuk membuang satu-satu program dari senarai Startup. Cara yang paling mudah ialah dengan menggunakan msconfig. Untuk melancarkan msconfig, klik pada Start Menu dan pilih Run (atau tekan sahaj Win+R). Pada kotak Run, taipkan msconfig dan tekan Enter. System Configuration Utility akan dipaparkan. Pergi kepada tab Startup dan anda boleh lihat senarai startup program. Hanya uncheck sahaja mana – mana program supaya ia tidak lagi dilancarkan secara automatik.

Bagi mendapatkan senarai Startup Program yang lebih lengkap dan menyeluruh, gunakan perisian Autoruns. Pastikan anda tahu program apa yang anda hadapi, sebelum membuat apa – apa perubahan.

Matikan Servis Yang Tidak Perlu

laju-xp-03 Servis adalah proses – proses yang dijalankan secara senyap, di balik tabir. Seperti Startup Program, ada sebilangan dari servis – servis ini yang tidak diperlukan oleh anda, dan boleh ditetapkan agar tidak dilancarkan secara automatik.

Untuk membuat tetapan pada servis, buka msconfig sekali lagi. Pergi kepada tab Services. Pastikan anda menanda kotak "Hide All Microsoft Services" (seperti dalam gambaraja) agar anda tidak tersilap membuang servis yang penting. Kemudian uncheck pada mana – mana servis supaya ia tidak lagi dilancarkan secara automatik

Untuk senarai servis – servis dalam Windows XP yang lebih lengkap, buka kotak Run dan taipkan services.msc. Di sini anda boleh lihat segala servis – servis yang terdapat dalam Windows XP.

Bersihkan PC Anda

Semakin lama anda menggunakan PC, semakin banyaklah Temporary File yang terkumpul dalam Windows anda. Temporary File ini adalah sampah – sarap yang perlu dibersihkan selalu agar ianya tidak membazirkan ruang dalam Hard Disk anda. Untuk membersihkan fail – fail ini, gunakan CCleaner.

Tingkatkan BIOS Anda

(Nota: Tips yang berkaitan dengan upgrade BIOS atau mematikan mana – mana fungsi dalam BIOS adalah agak teknikal. Pengguna baru adalah dinasihatkan supaya mengelakkan tips ini)

BIOS bereti Basic Input Ouput System, yang berfungsi untuk memulakan perkakasan – perkakasan dalam komputer anda sewaktu PC dihidupkan. Bergantung pada PC anda, pengubahsuaian BIOS boleh meningkatkan sedikit prestasi komputer.

Update BIOS Anda. Biasanya pengeluar komputer atau motherboard akan mengemaskini BIOS mereka, dan anda boleh download versi BIOS yang terbaru ini. Pastikan BIOS jenis apa yang anda pakai, dan cari update yang terkini di Internet. Setelah download, ikuti langkah yang diberikan untuk install BIOS tersebut.

Matikan Komponen Yang Tidak Digunakan. Motherboard anda mengandungi banyak komponen – komponen seperti RJ-45, bunyi, dan grafik. Anda boleh matikan komponen yang tidak diperlukan; melalui BIOS. Contohnya jika anda mempunyai kad wireless, anda tidak memerlukan lagi komponen Ethernet. Ataupun jika port VGA anda tidak digunakan, disable saja fungsinya. Jika anda ingin menggunakannya kembali, enable semula komponen tersebut melalui BIOS.

wsalam

p/s: harap2 dapat membantu.

Tuesday, February 16, 2010

MISTI johor 2010

salam

Johor Science, Technology and ICT Week (MISTI JOHOR) is one of the many events planned by Johor Science, Technology and ICT Unit (USTICT Johor). Apart from providing exposure related to the latest development in science, technology and ICT, it is also meant to promote and delivery the ICT system that can be accessed by the community and the development of The Johor New State Administrative Centre at Kota Iskandar and Wilayah Pembangunan Iskandar. MISTI JOHOR is also one of the event that responds to the desired of Malaysia’s Prime Minister, Y.A.B Datuk Seri Najib Tun Razak to make year 2010 as Malaysia’s Creativity and Innovative Year towards the 2020 Vision.

Our main objective of organizing MISTI JOHOR is to provide the public community interest with knowledge and information on issues related to advancements and awareness of science, technology and ICT, beside of threat in the ICT industry. On top of that, a variety of activities such as Exhibition, Seminars, Conferences, Workshops , Talks, Robotic Competition, Games Competition, Creative Photos, Treasure Hunt, Quizzes, Demo on Application Development and many others are also held during MISTI JOHOR.

Science, Technology and ICT Week 2010 will deliver a broad range of activities throughout the specific week. This year's event is expected to draw a bigger crowd as well-known and established agencies in both the private and government sectors, the media and the electronics sector will be participating. Participants will have the opportunity to visit more than 250 exhibition booths displaying the latest products and technology.

By having this program, we aim to inspire young people from primary and secondary school, IPT students, from various industry level and also from the government agencies.

In 2005 the MISTI JOHOR theme is centred on “Innovation and ICT Culture in Present Time” where by in 2007 was “It’s In Your Life” and for 2010 the theme is
" Better Lifestyle Through Innovation " . MISTI Johor 2010 will be held on 22nd June until 27th June 2010. Events will start as early as 8.00 am and will end at 10.00 pm throughout the particular weeks. However, it depends to the various activities that colour the schedule of events. The exhibition will open from 9.00 am to 6.00 pm while the conference, seminars or workshop will be from 8.00 am until 6.00 pm at the Persada Johor and Hotel Pan Pacific Johor Bahru. The official launching will be on 22nd June 2010 at the Convention Centre Persada Johor.


wsalam


official website : http://misti2010.johor.gov.my

Tuesday, February 9, 2010

Task Force FT17 Mersing Siri 1/2010

Pada 1 Februari 2010 yang lalu, satu Task Force bagi FT17 siri 1/2010 telah diadakan di SK Penyabong, Endau, Johor.Alhamdulilah , Task Force kali pertama ini telah mencapai objektif utamanya iaitu membantu sekolah-sekolah yang tiada FT mengatasi masalah-masalah ICT.Kami selaku mewakili pihak FT daerah Mersing telah cuba sedaya upaya membantu pihak sekolah dalam mengatasi segala masalah ICT khususnya yang melibatkan perisian Windows dan antivirus.Diucapkan ribuan terimah kasih kepada semua pihak yang telah menjayakan Task Force siri yang pertama ini.


Monday, February 8, 2010

Repair Windows Corrupt

Windows corrupt c:windowssystem32config

Windows XP could not start because the following file is missing or corrupt: \WINDOWS\SYSTEM32\CONFIG\SYSTEM

atau

Windows XP could not start because the following file is missing or corrupt: \WINDOWS\SYSTEM32\CONFIG\SOFTWARE

atau

Stop: c0000218 {Registry File Failure} The registry cannot load the hive (file): \SystemRoot\System32\Config\SOFTWARE or its log or alternate

atau

System error: Lsass.exe
When trying to update a password the return status indicates that the value provided as the current password is not correct.


kalau ada... cuba langkah nih


masuk cd windows... boot ikut cd... pastuh pegi kat recovery console... select 1 untuk pergi kat prompt... kalau dah dapat prompt... taip nih

C:\WINDOWS >cd system32\
ren config configold
mkdir config
cd config
copy c:\windows\repair\system
exit

pc akan reboot lepas nih..kalau masih tak leh masuk windows.... ulang langkah atas nih... tapi tambah command bawah nih selepas copy c:\windows\repair\system...


copy c:\windows\repair\software
copy c:\windows\repair\security
copy c:windows\repair\default

sumber : http://www.ftjohor.com/v1/viewtopic.php?f=27&t=354

Low Level Format

salam.

tips kali ni adalah untuk menggunakan aplikasi low level format. Harap dapat membantu.

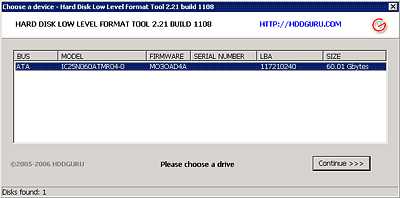
HDD Low Level Format Tool

HDD Low-Level Format Tool
Low Level Format Tool

License: Freeware

Operating System: MS Windows 2000SP4/2003/XP

HDD Low Level Format Tool is a freeware utility for low-level hard disk drive formatting.

  • Supported interfaces: S-ATA (SATA), IDE (E-IDE), SCSI, USB, FIREWIRE. Big drives (LBA-48) are supported.
  • Supported Manufacturers: Maxtor, Hitachi, Seagate, Samsung, Toshiba, Fujitsu, IBM, Quantum, Western Digital.
  • The program also supports low-level formatting of FLASH cards using a card-reader.

This freeware Low Level Format utility will erase, Low-Level Format and re-certify a SATA, IDE or SCSI hard disk drive with any size of up to 281 474 976 710 655 bytes. Will work with USB and FIREWIRE external drive enclosures. Low-level formatting of Flash Cards is supported too. Low Level Format Tool will clear partitions, MBR, and every bit of user data. The data cannot be recovered after using this utility. The program utilizes Ultra-DMA transfers when possible.

WARNING: After running this free low level format tool, the whole disk surface will be fully erased.
Therefore, data restoration will be impossible after using this utility!

sumber : http://hddguru.com/

Download Windows installer: HDD Low Level Format Tool ver.2.36 build 1181


Saturday, February 6, 2010

Cara mengubah drive icon dan label hdd anda

salam

tips kali ini adalah untuk mengubah drive icon dan label hdd anda. Harap-harap dapat membantu.

To change Drive icon:
1- Click Start > Click Run > type “regedit” to run Registry Editor
2- Find following:
HKEY_LOCAL_MACHINE / SOFTWARE / Microsoft / Windows / CurrentVersion / Explorer
3-create a new Key and name “DriveIcons”
4- Under DriveIcons create a new Key with the drive letter ( for example C ), within drive letter create a new key and name “DefaultIcon”.
5- Give the default value , the icon you want to use, for example : c:\windows\system32/shell32.dll,74

To change Drive Label:
Do step one and two

Under DriveIcons create a new Key with the drive letter ( for example C ), within drive letter create a new key and name “DefaultLabel”.
Give the Default Value, the label you want. For example Windows.

Close Registry Editor and reboot your Computer

Note: mengubah registry mungkin akan merosakkan sistem operasi komputer anda. sila buat Restore Point dahulu untuk mengelakkan sebarang kemungkinan.

wsalam

Monday, February 1, 2010

Khidmat Internet TM terganggu akibat kerosakan sirkit

KUALA LUMPUR: Perkhidmatan Internet Telekom Malaysia Bhd (TM), hari ini mengalami gangguan berikutan kerosakan sirkit pada kabel dasar laut yang menghubungkan Malaysia dan Amerika Syarikat (AS) di Asian American Gateway (AAG) yang terletak di Lantau, China.

Menurut kenyataan TM hari ini, berikutan masalah itu, pelanggan akan mengalami sambungan Internet yang perlahan ketika melayari laman-laman web yang dihoskan di Hong Kong dan AS.

Mereka yang menggunakan perkhidmatan Protokol Internet (IP) lain seperti Rangkaian Persendirian Maya (VPN) serta aplikasi perniagaan kritikal yang dihubungkan ke Hong Kong dan AS juga mungkin mengalami gangguan perkhidmatan.

Bagi mengatasi masalah itu, beberapa laluan Internet dialihkan ke sambungan alternatif bagi mengurangkan kesesakan, tambah kenyataan itu.

Menurut TM, berikutan kerja membaik pulih itu, trafik ke Amerika Utara dan Hong Kong dijangka mengalami gangguan manakala trafik ke negara lain adalah seperti biasa.

Pelanggan TM boleh menghubungi syarikat itu di talian 100 dan pilih "perkhidmatan Internet" atau menghantar e-mel di help@tm.com.my untuk membuat laporan mengenai sebarang masalah perkhidmatan internet berkaitan. - Bernama


sumber: bharian online